

Reviving a vintage engine through a meticulous rebuild process is more than just restoring a piece of automotive history; it is an opportunity to enhance its performance while preserving its original charm. Many classic car enthusiasts undertake engine rebuilding not only to improve horsepower and torque but also to ensure reliability and longevity.
The journey of rebuilding a classic engine involves a deep understanding of its unique characteristics and potential. By updating worn-out components with modern alternatives, one can harness the power of contemporary engineering while maintaining the vehicle’s authenticity. The essence of a successful rebuild lies in creating a balance between vintage aesthetics and modern performance advancements.
Moreover, a well-executed engine rebuild can dramatically transform the driving experience of a classic vehicle. Enhanced performance features such as improved fuel efficiency, better throttle response, and greater power output can breathe new life into the engine, making driving a more exhilarating experience. This transformation not only increases the car’s functionality but also elevates its value in the classic car market.
Choosing the Right Components for Vintage Engine Performance
When undertaking a vintage engine rebuild, selecting the appropriate components is crucial for achieving enhanced performance. Vintage engines often have unique characteristics that require careful consideration to ensure a successful upgrade.
Firstly, assess the engine’s original specifications and determine how much power increase is desired. This understanding will guide the selection of components such as pistons, camshafts, and cylinder heads. Opt for high-performance pistons that maintain compatibility with the vintage block while providing improved strength and reduced weight for better efficiency.
A performance-oriented camshaft is key in maximizing the engine’s potential. Research available options that match your specific engine type, ensuring the lift and duration are suitable for your performance goals. Pairing the right camshaft with upgraded valve springs can optimize engine breathing, contributing significantly to overall performance.
Cylinder heads should be evaluated and potentially replaced with enhanced versions that allow for better airflow. Aftermarket heads tailored for vintage engines can feature improved port designs and larger valves, which can lead to noticeable gains in horsepower and torque.
Additionally, consider the induction system. Upgrading to a performance carburetor or fuel injection system can provide improved fuel atomization and better throttle response. Ensure that the intake manifold matches the rest of the engine setup for optimal performance.
Don’t overlook the ignition system; a high-performance distributor and spark plugs will ensure reliable ignition and fuel combustion, further enhancing engine performance. Also, stronger ignition coils can provide more spark energy, which is particularly beneficial for performance applications.
Lastly, invest in quality gaskets and seals to ensure reliability after the rebuild. High-performance components may generate more heat and stress, making robust sealing crucial to prevent leaks and ensure longevity of the engine.
In conclusion, rebuilding a vintage engine for enhanced performance involves careful selection of components that maximize efficiency while respecting the engine’s original design. Each component plays a vital role in achieving a balanced and powerful vintage engine capable of delivering exceptional performance.
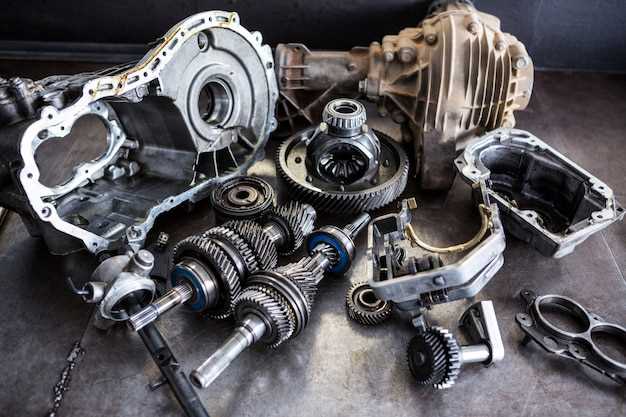
Step-by-Step Guide to Engine Disassembly and Inspection
Disassembling an engine is a critical part of the rebuilding process and plays a significant role in enhancing performance. This guide outlines essential steps to ensure a thorough inspection and successful rebuild.
1. Preparation: Before starting the disassembly, gather all necessary tools, including wrenches, sockets, and an engine stand. Make sure the workspace is clean and organized to facilitate the process.
2. Documentation: It’s vital to document the engine’s current state, including taking photographs and notes of connections, positions, and orientations of components. This will aid reassembly later.
3. Drain Fluids: Begin by draining all fluids, such as engine oil and coolant, to avoid spills and contamination during the process.
4. Remove Accessories: Detach any external components like the air intake, exhaust system, and electrical connections. Label each component to ensure easy identification during reassembly.
5. Disassemble the Engine Block: Start by removing the cylinder head. Use a torque wrench to undo bolts systematically, preventing warping. Follow this by taking off the intake and exhaust manifolds and any remaining components attached to the engine block.
6. Inspect Components: As you remove each part, carefully inspect it for wear and damage. Pay special attention to the cylinder walls, pistons, and bearings. Look for excessive wear, scoring, or any signs of damage that may affect performance.
7. Clean Parts: After disassembly, clean all components thoroughly. Use a solvent and brush to remove built-up grease and grime. This step is vital for an accurate evaluation of the parts’ condition.
8. Measure and Assess: Utilize precision measuring tools to assess component tolerances. Check the cylinder bore, piston ring gaps, and bearing clearances to identify areas that may require machining or replacement.
9. Create an Inventory: Compile an inventory of all components, noting their condition and whether they can be reused or need replacement. This will streamline the rebuilding phase.
10. Prepare for Reassembly: Once inspection and cleaning are complete, organize all parts and tools for the upcoming rebuild. Ensure that new parts, if needed, are ordered and available.
Following these steps will facilitate a comprehensive engine disassembly and inspection, setting the stage for a successful rebuild that enhances overall performance.
Tuning Techniques for Maximizing Power Output in Rebuilt Engines
When it comes to rebuilding vintage engines, tuning techniques play a critical role in maximizing power output. Achieving a perfect balance between performance and reliability requires careful calibration of various engine components. The following techniques are essential for enhancing the effectiveness of rebuilt engines.
First, optimizing the air-fuel mixture is vital. A proper carburetor or fuel injection setup ensures an ideal ratio, which can significantly boost performance. Adjusting jets, altering fuel pump pressure, and fine-tuning the timing advance help achieve the right balance for enhanced combustion efficiency.
Next, upgrading the ignition system can lead to substantial improvements in power. High-performance spark plugs, ignition coils, and aftermarket distributors enhance spark intensity and timing accuracy, which results in smoother combustion and better throttle response.
Another crucial technique is enhancing the engine’s breathing capabilities. Installing performance headers, a free-flowing exhaust system, and larger intake manifolds allows for improved airflow, which directly relates to power output. Ensuring that the engine can exhale efficiently enables quicker revs and reduces back pressure.
Cylinder head modifications also provide considerable gains. Porting and polishing the intake and exhaust ports can improve airflow dynamics. Additionally, upgrading valves and valve springs can allow for higher lift and better durability, further optimizing the performance of a rebuilt engine.
Lastly, selecting the right camshaft profile can redefine the power band of a vintage engine. A performance cam can increase horsepower and torque, but careful consideration must be given to the intended use of the vehicle to avoid sacrificing drivability.
By applying these tuning techniques, enthusiasts can unlock the hidden potential of rebuilt vintage engines, transforming them into powerful machines that deliver exhilarating performance on the road.